157 lines
6.5 KiB
Markdown
157 lines
6.5 KiB
Markdown
The software runs on the ESP8266. The web app is stored in SPIFFS (on-board flash memory). I've forked [jasoncoon's esp8266 fastled webserver](https://github.com/jasoncoon/esp8266-fastled-webserver) and added some extra functionality, made a proper config area and created custom patterns for the lamp.
|
|
Amazon Alexa support and Node-RED integration will follow soon.
|
|
|
|
**The software can be found on [GitHub](https://github.com/NimmLor/esp8266-fastled-desk-light).**
|
|
|
|
For beginners I would recommend watching this setup tutorial below.
|
|
|
|
|
|
|
|
## 1. Programming Environment
|
|
|
|
1. The code requires an installed version of **Arduino IDE 1.8.8** which can be downloaded [here]( https://www.arduino.cc/en/Main/OldSoftwareReleases#previous ).
|
|
|
|
2. The ESP8266 boards need to be added to the Arduino IDE:
|
|
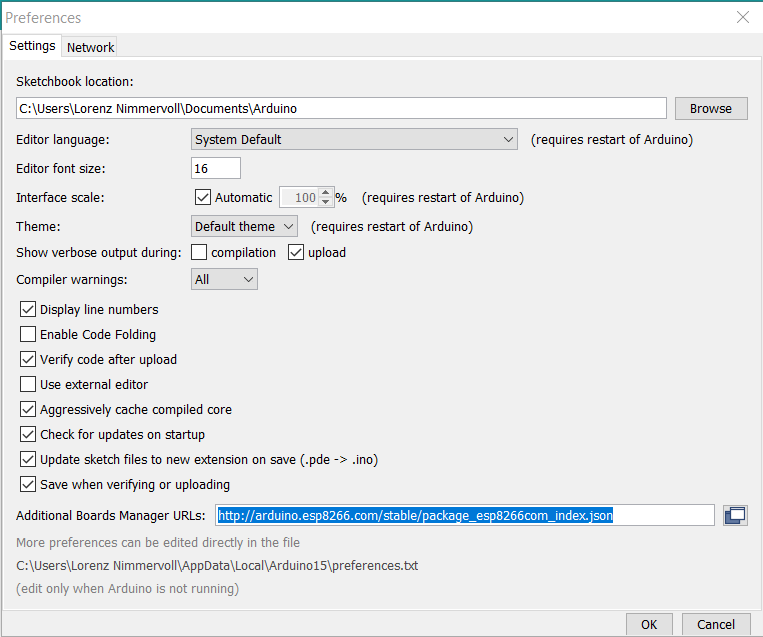
Click on *File >> Preferences* and paste the URL "http://arduino.esp8266.com/stable/package_esp8266com_index.json" into the **Additional Boards Manager URLs** field.
|
|
|
|
|
|
|
|
3. Install the CH340/341 USB Driver
|
|
|
|
- Download and install the driver from e.g. [Arduined]( https://www.arduined.eu/ch340-windows-8-driver-download/ )
|
|
|
|
4. The Boards need be installed in the Arduino IDE
|
|
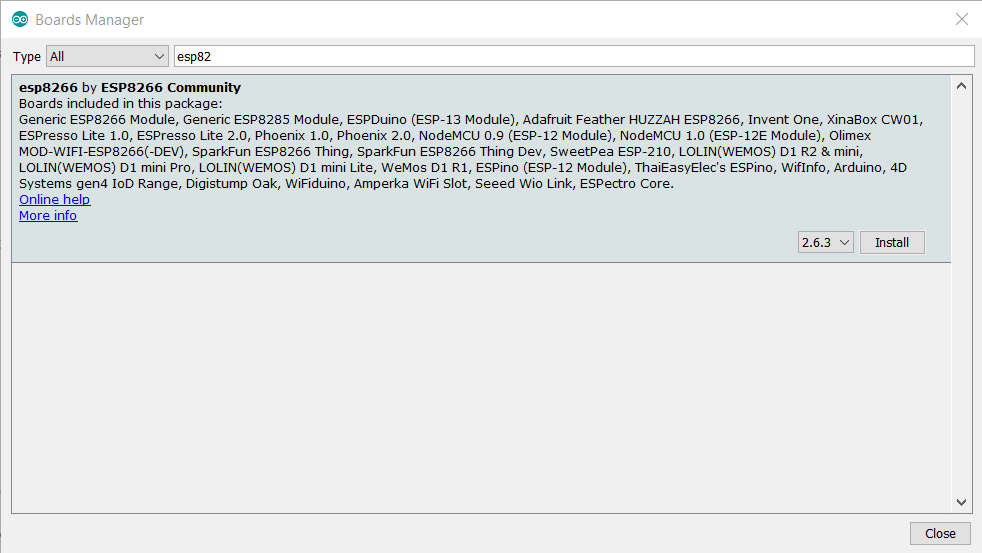
Click on *Tools >> Board >> Boards Manager* and install **esp8266, version 2.6.3**
|
|
|
|
|
|
|
|
5. The LED Library **FastLED** is also required
|
|
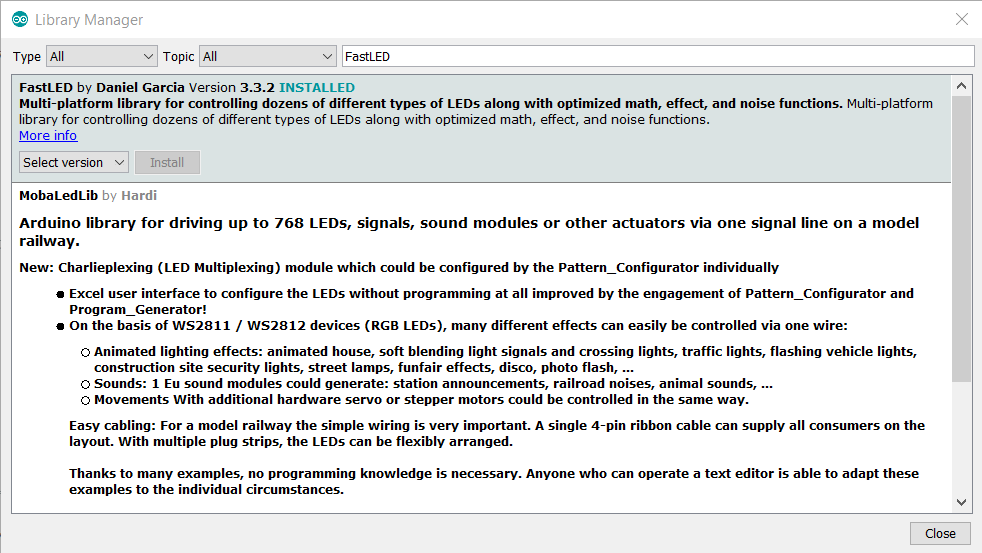
Click on *Sketch >> Include Library >> Manage Libraries* and install **FastLED, version 3.3.2**
|
|
|
|
|
|
|
|
6. Install the *ESP8266FS* **Sketch Data Upload Tool**:
|
|
|
|
> - Download the tool: https://github.com/esp8266/arduino-esp8266fs-plugin/releases/download/0.2.0/ESP8266FS-0.2.0.zip.
|
|
>
|
|
> - In your Arduino sketchbook directory, create `tools` directory if it doesn't exist yet
|
|
>
|
|
> - Unpack the tool into `tools` directory (the path will look like `/Arduino/tools/ESP8266FS/tool/esp8266fs.jar`)
|
|
>
|
|
> - Restart Arduino IDE
|
|
>
|
|
> // [source]( http://arduino.esp8266.com/Arduino/versions/2.3.0/doc/filesystem.html#uploading-files-to-file-system )
|
|
|
|
7. (Optional) Install *Espalexa* for Amazon Alexa Support
|
|
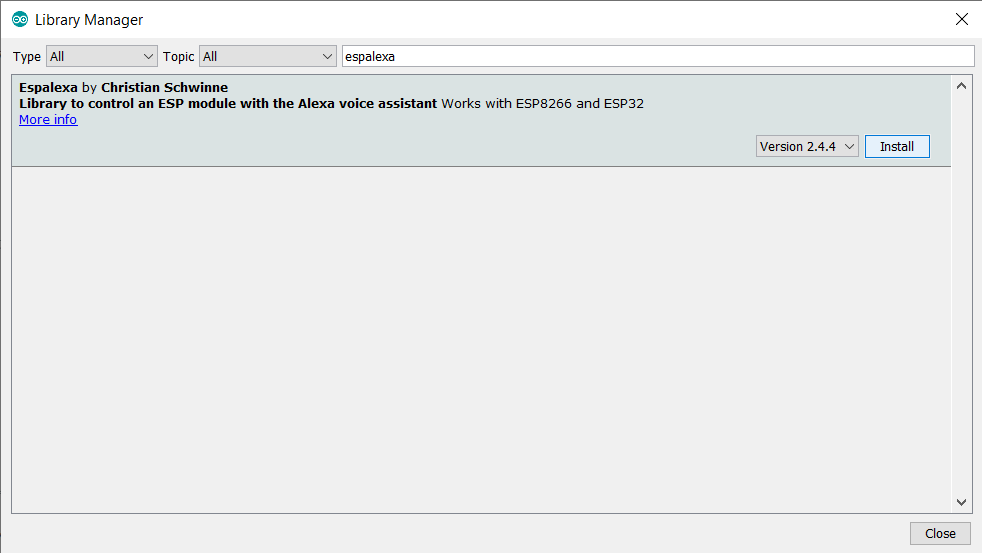
Click on *Sketch >> Include Library >> Manage Libraries* and install **Espalexa, version 2.4.4**
|
|
|
|
|
|
|
|
|
|
|
|
|
|
|
|
## 2. Software Configuration
|
|
|
|
1. Download the Project from the [Releases at Github]( https://github.com/NimmLor/esp8266-nanoleaf-webserver/releases ) and extract the archive
|
|
|
|
2. Open the **.ino** file inside the folder in the Arduino IDE
|
|
|
|
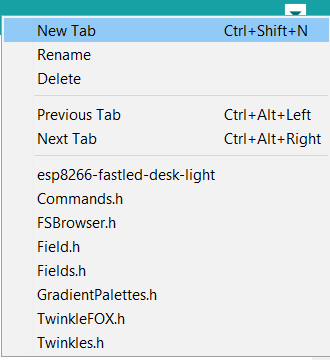
3. Create the **Secrets.h** file
|
|
*Top Right Corner >> New Tab >> "Secrets.h"*
|
|
|
|
|
|
|
|
4. Paste the following code and fill in your WiFi credentials
|
|
|
|
```c++
|
|
// AP mode password
|
|
const char WiFiAPPSK[] = "your-password";
|
|
|
|
// Wi-Fi network to connect to (if not in AP mode)
|
|
char* ssid = "your-ssid";
|
|
char* password = "your-password";
|
|
|
|
// MQTT user / password
|
|
const char* mqttUser = "your-mqtt-user";
|
|
const char* mqttPassword = "your-mqtt-password";
|
|
```
|
|
|
|

|
|
|
|
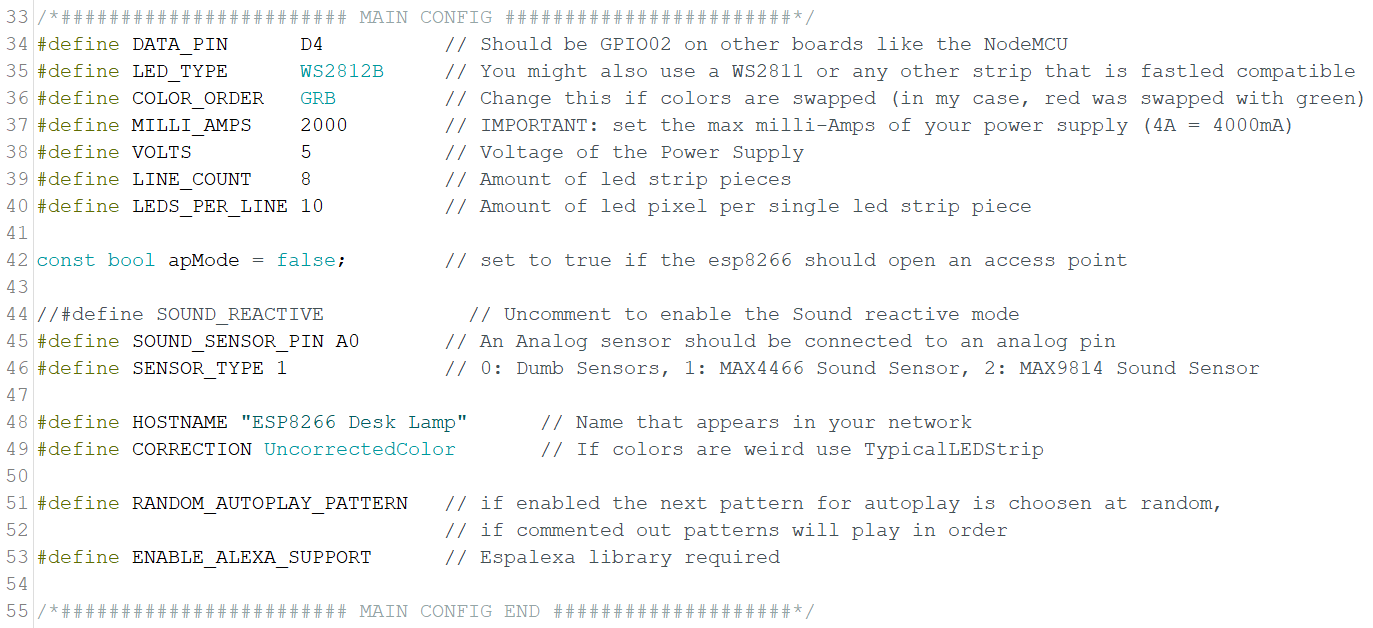
5. Configure the parameters
|
|
In the .ino file there are many parameters to change and tweak the essential settings are:
|
|
- `DATA_PIN`: The pin where the LED-Strip is connected (Note: If you are using another controller such as a clone or a NodeMCU board, you may need to configure the pin assignment for FastLED, See also [this entry in the FastLED Wiki](https://github.com/FastLED/FastLED/wiki/ESP8266-notes))
|
|
|
|
- `LED_TYPE`: The type of LED strip that is used (WS2812B, WS2811, ...)
|
|
|
|
- `COLOR_ORDER`: Ordering of the colors sent, **depends on the LED-Strip**, if colors are swapped, then swap the Letters (RGB, RBG, GRB, GBR, BRG, BGR)
|
|
|
|
- `LEDS_PER_LINE`: Amount of LEDs inside **1x** slot of the core
|
|
|
|
- `SOUND_REACTIVE`: Uncomment to enable a sound reactive pattern when using a sound sensor
|
|
- `SENSOR_TYPE`: Model of the [Sensor](http://s.click.aliexpress.com/e/_sYiUrz) used
|
|
|
|
- `ENABLE_ALEXA_SUPPORT`: Uncomment to disable the Amazon Alexa Support
|
|
|
|
|
|
|
|
|
|
|
|
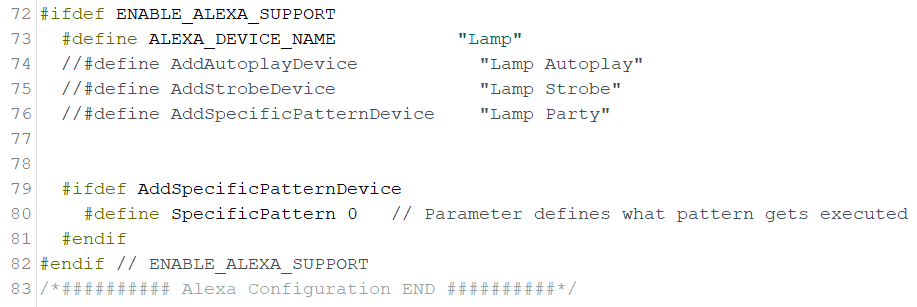
6. (Optional) Configure Alexa
|
|
|
|
- Installation of the **Espalexa** library required
|
|
- Requires `ENABLE_ALEXA_SUPPORT`
|
|
- The name of the device is set in the variable `ALEXA_DEVICE_NAME`
|
|
- Configuration of addition Devices
|
|
|
|
- In order to control more parameters, the code allows to create additional devices that control, i.e. a specific pattern or the autoplay functionality
|
|
- To make use of these features remove the `//` in front of the `#define ...`
|
|
|
|
|
|
|
|
|
|
7. (Optional) Configure MQTT
|
|
|
|
- Installation of "PubSubClient" and "ArduinoJson" libraries required
|
|
- Requires `ENABLE_MQTT_SUPPORT`
|
|
- It's preconfigured for Home Assistant Mosquitto MQTT service
|
|
- Enables sync with home assistant and from there to Google Assistant
|
|
|
|
|
|
## 3. Upload
|
|
|
|
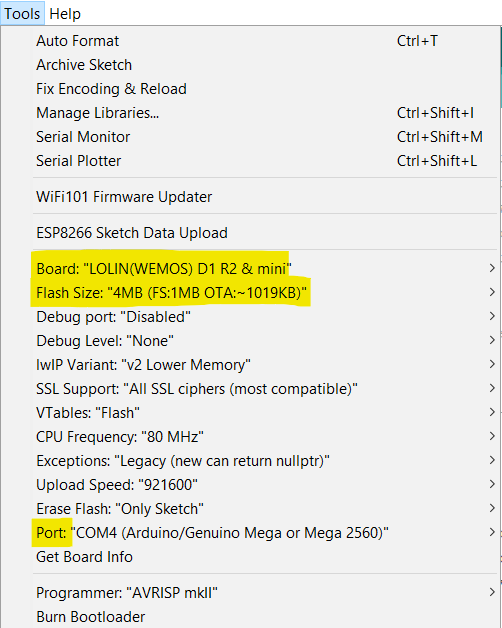
1. Configure the upload settings in **Tools** menu, there are **3 essential settings**
|
|
- **Board: LOLIN(WEMOS) D1 R2 & mini**: when using the recommended Wemos D1 Mini
|
|
- **Flash Size: "4MB (FS:1MB OTA:~1019KB)"**
|
|
- **Port:** COMxx, if there are multiple ports, then replug your esp8266 to find the correct port. (**Hint:** COM1 is usually your PCs internal parallel port and not the esp8266)
|
|
|
|
|
|
|
|
2. Hit the **Upload** button to upload the code
|
|
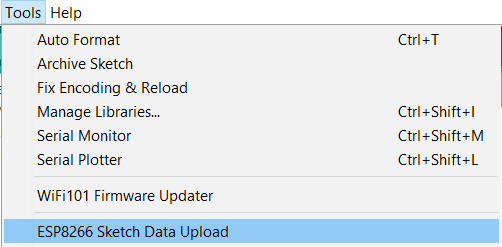
3. **Upload the Sketch Data**
|
|
Click on *Tools >> ESP8266 Sketch Data Upload*
|
|
|
|
|
|
|
|
4. (Optional) Open the **Serial Monitor** to find the IP address of esp8266
|
|
- Click on *Tools >> Serial Monitor*
|
|
- When pressing the *Reset-Button* on the esp8266, the console should print the IP-Address
|
|
5. Connect to the UI by opening http://ip_address/ in your browser of choice, this works on mobile devices too
|
|
|
|
|
|
## 4. Alexa Configuration
|
|
|
|
The connect your esp8266, the "Pairing-Mode" mode must be activated to add it to your Smart-Home devices in the alexa app.
|
|
|
|
Open http://ip_of_the_esp8266/alexa in your browser, the window should tell you that it is ready to be discovered by your alexa device.
|
|
|
|
**Important**: The esp8266 and you Amazon Echo device **must** be in the same network.
|
|
|
|
Just say to your echo, "Alexa, discover devices". This phrase can be spoken out in English on any echo device independent of the device's language.
|
|
|
|
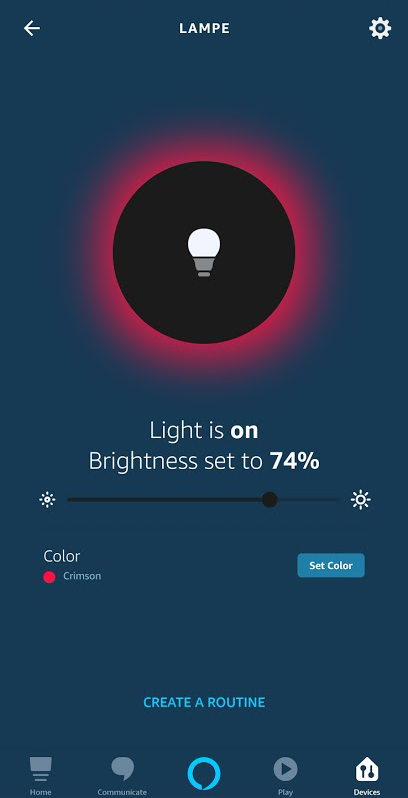
After around 30 seconds, Alexa should respond with the devices that were found. These should show up in the Alexa app.
|
|
|
|
|
|
|