6.1 KiB
The software runs on the ESP8266. The web app is stored in SPIFFS (on-board flash memory). I've forked jasoncoon's esp8266 fastled webserver and added some extra functionality, made a proper config area and created custom patterns for the lamp. Amazon Alexa support and Node-RED integration will follow soon.
The software can be found on GitHub.
For beginners I would recommend watching this setup tutorial below.
1. Programming Environment
-
The code requires an installed version of Arduino IDE 1.8.8 which can be downloaded here.
-
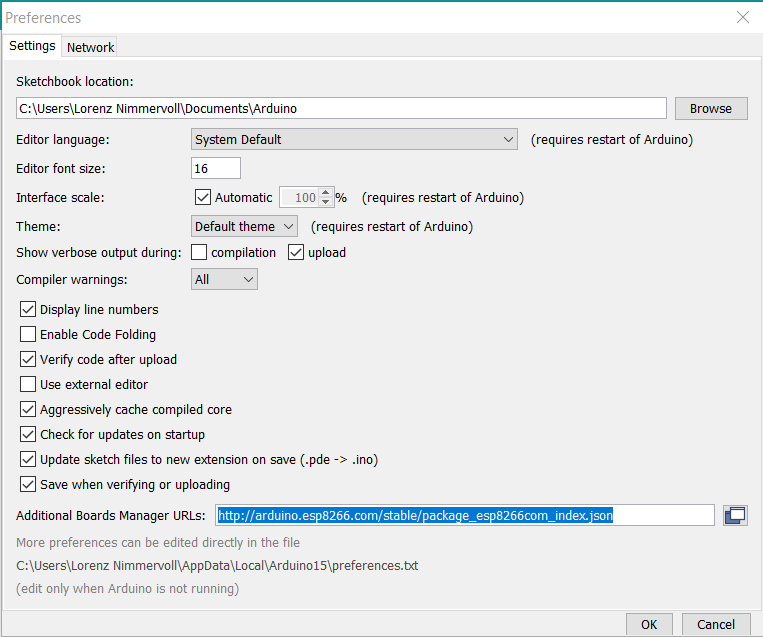
The ESP8266 boards need to be added to the Arduino IDE: Click on File >> Preferences and paste the URL "http://arduino.esp8266.com/stable/package_esp8266com_index.json" into the Additional Boards Manager URLs field.
-
Install the CH340/341 USB Driver
- Download and install the driver from e.g. Arduined
-
The Boards need be installed in the Arduino IDE Click on Tools >> Board >> Boards Manager and install esp8266, version 2.6.3

-
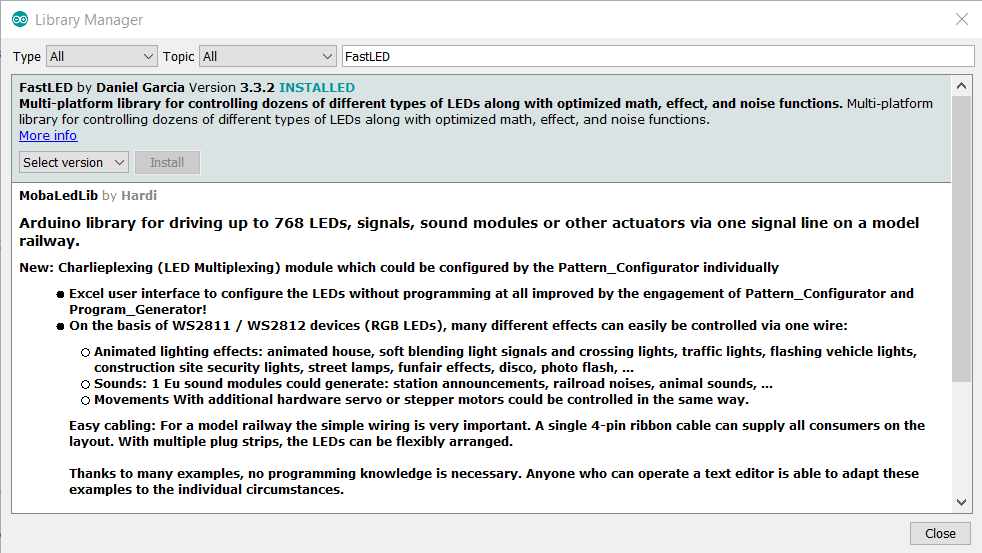
The LED Library FastLED is also required Click on Sketch >> Include Library >> Manage Libraries and install FastLED, version 3.3.2
-
Install the ESP8266FS Sketch Data Upload Tool:
-
Download the tool: https://github.com/esp8266/arduino-esp8266fs-plugin/releases/download/0.2.0/ESP8266FS-0.2.0.zip.
-
In your Arduino sketchbook directory, create
toolsdirectory if it doesn't exist yet -
Unpack the tool into
toolsdirectory (the path will look like/Arduino/tools/ESP8266FS/tool/esp8266fs.jar) -
Restart Arduino IDE
// source
-
-
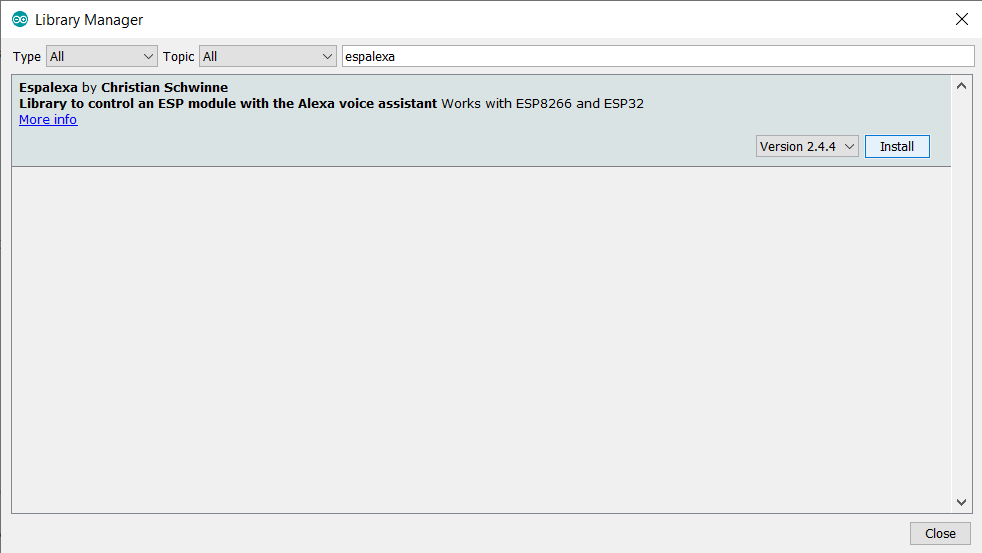
(Optional) Install Espalexa for Amazon Alexa Support Click on Sketch >> Include Library >> Manage Libraries and install Espalexa, version 2.4.4
2. Software Configuration
-
Download the Project from the Releases at Github and extract the archive
-
Open the .ino file inside the folder in the Arduino IDE
-
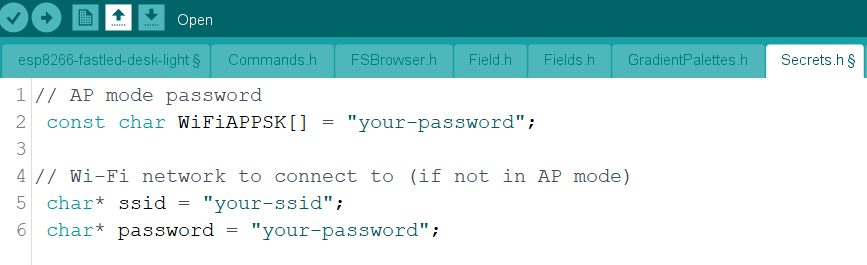
Create the Secrets.h file Top Right Corner >> New Tab >> "Secrets.h"

-
Paste the following code and fill in your WiFi credentials
// AP mode password
 const char WiFiAPPSK[] = "your-password";

// Wi-Fi network to connect to (if not in AP mode)
 char* ssid = "your-ssid";
 char* password = "your-password";
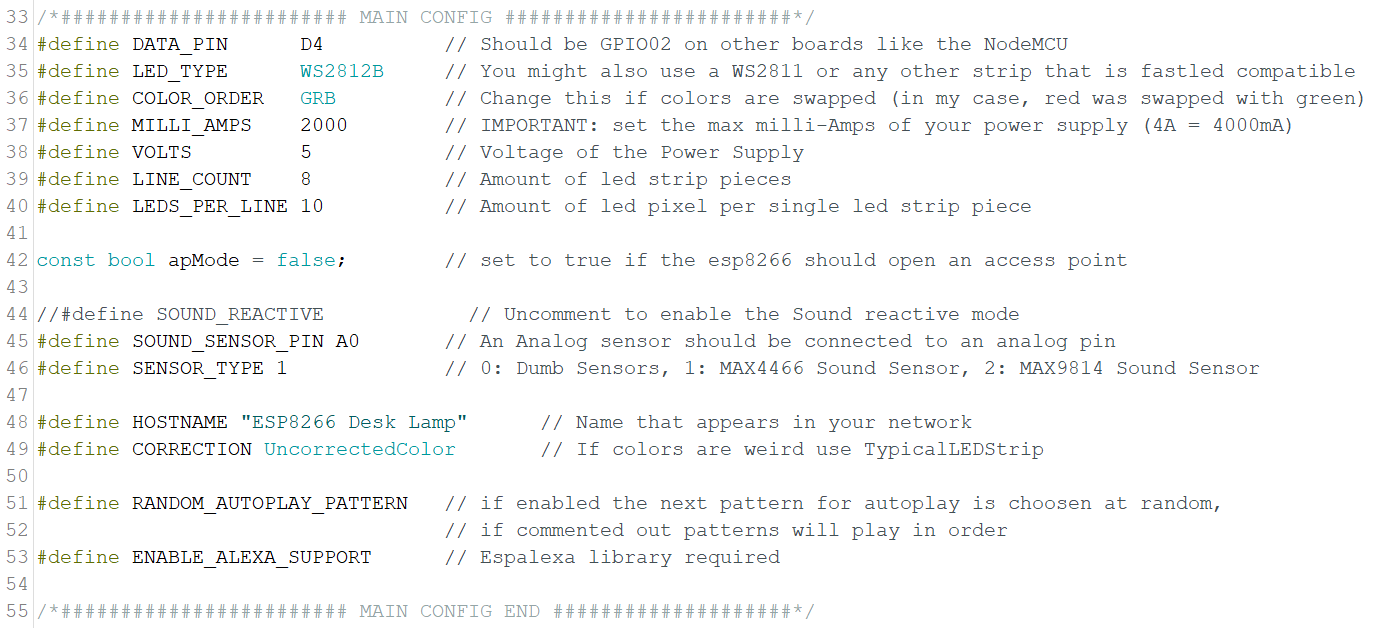
- Configure the parameters In the .ino file there are many parameters to change and tweak the essential settings are:
-
DATA_PIN: The pin where the LED-Strip is connected (Note: If you are using another controller such as a clone or a NodeMCU board, you may need to configure the pin assignment for FastLED, See also this entry in the FastLED Wiki) -
LED_TYPE: The type of LED strip that is used (WS2812B, WS2811, ...) -
COLOR_ORDER: Ordering of the colors sent, depends on the LED-Strip, if colors are swapped, then swap the Letters (RGB, RBG, GRB, GBR, BRG, BGR) -
LEDS_PER_LINE: Amount of LEDs inside 1x slot of the core -
SOUND_REACTIVE: Uncomment to enable a sound reactive pattern when using a sound sensor -
SENSOR_TYPE: Model of the Sensor used -
ENABLE_ALEXA_SUPPORT: Uncomment to disable the Amazon Alexa Support
- (Optional) Configure Alexa
-
Installation of the Espalexa library required
-
Requires
ENABLE_ALEXA_SUPPORT -
The name of the device is set in the variable
ALEXA_DEVICE_NAME -
Configuration of addition Devices
- In order to control more parameters, the code allows to create additional devices that control, i.e. a specific pattern or the autoplay functionality
- To make use of these features remove the
//in front of the#define ...

3. Upload
- Configure the upload settings in Tools menu, there are 3 essential settings
- Board: LOLIN(WEMOS) D1 R2 & mini: when using the recommended Wemos D1 Mini
- Flash Size: "4MB (FS:1MB OTA:~1019KB)"
- Port: COMxx, if there are multiple ports, then replug your esp8266 to find the correct port. (Hint: COM1 is usually your PCs internal parallel port and not the esp8266)

- Hit the Upload button to upload the code
- Upload the Sketch Data Click on Tools >> ESP8266 Sketch Data Upload

- (Optional) Open the Serial Monitor to find the IP address of esp8266
- Click on Tools >> Serial Monitor
- When pressing the Reset-Button on the esp8266, the console should print the IP-Address
- Connect to the UI by opening http://ip_address/ in your browser of choice, this works on mobile devices too
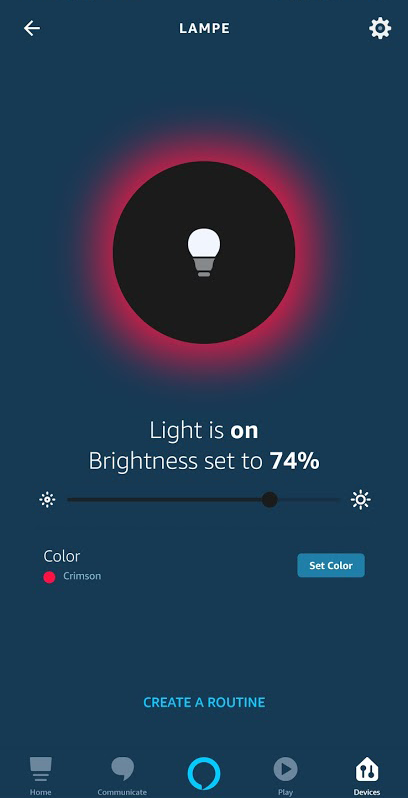
4. Alexa Configuration
The connect your esp8266, the "Pairing-Mode" mode must be activated to add it to your Smart-Home devices in the alexa app.
Open http://ip_of_the_esp8266/alexa in your browser, the window should tell you that it is ready to be discovered by your alexa device.
Important: The esp8266 and you Amazon Echo device must be in the same network.
Just say to your echo, "Alexa, discover devices". This phrase can be spoken out in English on any echo device independent of the device's language.
After around 30 seconds, Alexa should respond with the devices that were found. These should show up in the Alexa app.